
How to change the strings on your Banjo, Mandolin, Guitar, Ukulele and other stringed instruments
Eagle Music explains here all the do’s and don’ts when fitting a new set of strings to your instrument. It is important that you understand that the weight, size and tension of your strings affects the set-up and action of your instrument.
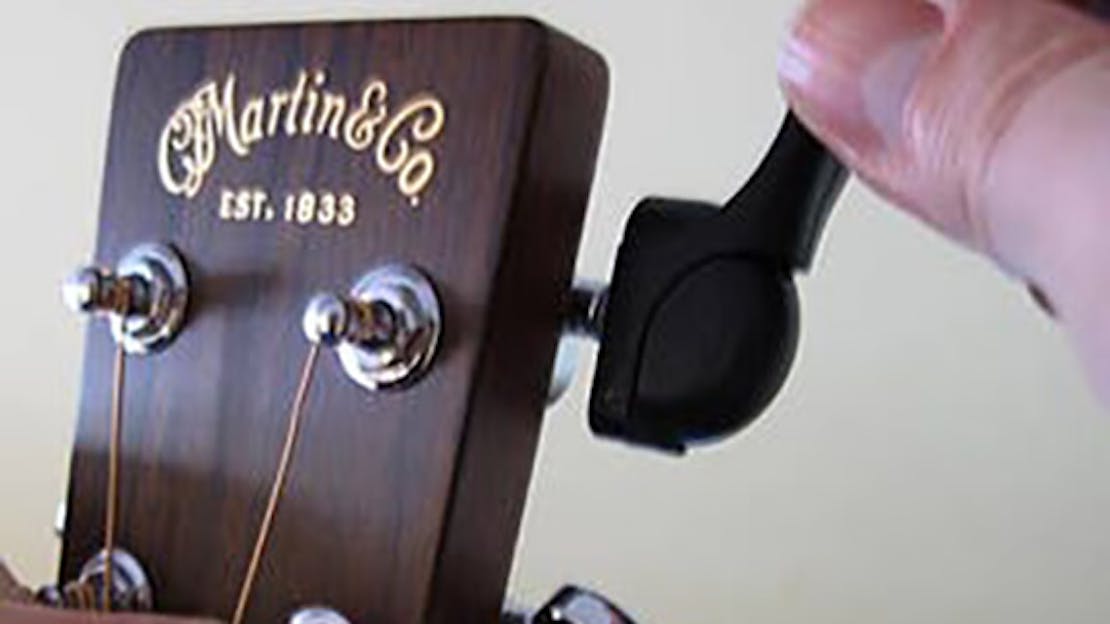
First, I offer you this simple advice, invest in a string winder. A string winder will take all the work out of string changing and as an added bonus it will speed up the process! I insist that string winders are used at all times in our workshop, this ensures that our customers get a lower priced bill when it comes to the cost of paying for workshop time!
In the following notes, I shall assume that you are a right handed person, and that you are going to change the strings and then tune your instrument to standard tuning. The string set that we are using in the example is our most popular standard Eagle-Puretone set as follows, 1st also referred to as the ‘top’ -string is the furthest away from your chin when holding your instrument in the playing position. (If your instrument is part of the mandolin family, you will have a pair of 1st strings) The ‘bottom string’ is the string that is nearest your chin.
The string numbers eg.’9’ or ‘12’ refer to the diameter of the strings and they are measured in imperial measurement, which is used by the USA manufacturers (Not Metric) a ‘9’ for example measures .009” (which is nine thousandth’s of an inch in diameter)
Also take note before changing your strings what gauge of string set is already on your instrument, if your instrument is correctly set-up, the nut will have been cut to suit the gauge of strings that are already on your instrument. Changing up to heavier strings, without having your top nut cut to suit, can cause the thicker strings to bind in the nut. Slight binding can be cured by rubbing a little graphite into the slot (an HB graphite pencil or softer is fine).
Remove your Old strings
Please Note: Your instrument is ‘SET UP’ under tension, so it is a good idea when string changing, not to take all your strings off at the same time. Change one at a time. Slacken off your 1st string and unwind it from the capstan/pillar on your tuning peg, then remove the string from the tailpiece or bridge saddle.
Attach the new string to the tailpiece or bridge saddle, note from the remaining old strings that are still on your instrument, how the strings fit to your tailpiece or bridge. For example: Tailpieces on banjos come in many designs and on some tailpieces the string lays across the top/front of the tailpiece.
Hold some tension on the string to keep it attached to the tailpiece/bridge, as you lay it along your fingerboard and feed it through the hole in the pillar on your tuning peg, pull the string through the pillar with your left hand until there is no ‘slack’ on the string. Keep tension on the string with your left hand. Some of this excess that is now pulled through your pillar will be ‘cut off’ when you have tuned the string to its correct pitch.
At this stage you need to give yourself some ‘slack’ on the string, this ‘slack’ will allow you to put at last three turns around the pillar/capstan on your tuning peg. To do this, keep hold of the string with your left hand pull tension on the string. Then place your right hand index, middle and ring fingers behind the string near the pillar with the back of your fingers touching the instrument and ‘clamp’ the string against your fingers with your right hand thumb. Still holding tension on the string with your left hand, transfer your grip to hold the tension of the string now with your right hand.
Turn your right hand approximately ninety degrees with your index finger remaining in contact with your instrument, this action will pull some ‘slack’ back through the pillar. At this point ‘kink’ the string to ‘dog-leg’ the string as it enters and leaves the hole in the pillar, now in the same motion wind the string around the pillar to take up some of the ‘slack’ that you are holding in your right hand. Note the direction that the string winds around the pillar. It will be wound in the same direction as the old SECOND string that is still attached to your instrument. (Anti clockwise, assuming that the old string was fitted correctly!)
Tuning the 1st String
Carrying on from iii. above and still holding tension on the string with your right hand to keep it attached to the tailpiece, move you left hand to the tuning peg button and start to wind tension onto the string. At this point note that the string is located in its groove in the nut of your instrument, also that you are turning the tuning peg in the correct direction …you can see the pillar rotating as you wind the tuner peg. Carry on turning the tuner button until you take up all the ‘slack’ from your right hand. Then continue to ‘tune’ the 1st string to pitch. A clip-on electronic tuner is very useful for this operation, also to speed up the operation, use of a ‘string winder’ which is very helpful. At this stage you can ‘cut off’ the excess from the string …always tune your string BEFORE cutting off the excess. A small pair of wire cutters is a handy tool to have in your instrument bag, or you may want to invest in a state-of-the-art ‘string speed winder’ that has a pair of clippers on the end of the winder. For neatness, clip the string close to the pillar leaving approximately 6mm (¼”) Angle the remaining part of the string towards the neck face to avoid spiking yourself, but ensure that it does not touch the face of the neck which can scratch the finish when it is being wound.
Fitting and Tuning the 2nd, 3rd 4th etc. Strings
Fit the 2nd string using the same method as the first string and tune it to pitch. Fit the 3rd string in a similar way and tune it to pitch. Note that it winds around the pillar in the correct direction. Then fit the wound 4th string and tune it to pitch. Note also that the fourth string winds around the pillar in the correct direction. Carry on with the remainder of your strings with the same method. NOTE: NEVER cut the excess off a wound string before it is tuned to pitch, doing so can cause the string to unwind and loosen it’s winding along the length of the string.
5-string Banjos Only:-
Fitting and tuning the 5th or Octave String
The fifth or ‘octave’ string is attached to the tailpiece in the same manner as your other four strings, but it will have a guide on the neck of your banjo, it may also have a plastic ‘sleeve’ that fits onto the string to protect the side of your banjo neck. Take note of such things when you remove your old 5th string. Again ensure that you give it enough ‘slack’ when fitting to allow at least three turns around the pillar of the tuner button. The fifth string is tuned to high ‘G’ which is an octave above your 3rd ‘G’ string.
I have written these notes as simply as I could to help the beginner. I have tried my best to write down and explain the way that I change my own instrument strings! String changing is very much a ‘knack’ and I am certain that you will develop your own ‘knack’ of changing your strings based on the above notes.